to get started, you may get more tricks after reading this guide.
- Introduction
- Install and Register
- FAQ
- File Search
- Add Bookmarks
- Dual Pane
- Batch Rename
- Archive/Extract
- Timeline
- PhotoMax
- Light / Dark Mode
- Customize Settings
- Uninstall / Remove
Product Introduction
Windows Explorer (File Explorer) for Windows has been doing a decent job since the tree view is designed. ExplorerMax is a complete and smarter alternative that brings badly-needed features that Windows Explorer does not provide. It offers all of the standard features that you expect from default Windows Explorer. Plus, it brings you with the following features:
1. Tabbed browsing. In default Windows explorer, if you opened too many folders at the same time, it would be very annoying to choose a specified folder because they all suspend near the task bar. With tabbed browsing feature, just as tabbed browser like Google Chrome, or Mozilla Firefox, you can access all the folders from one pane.
2. Batch file-renaming. When you have to rename a lot of files in a folder, it would be tedious to rename them one by one. ExplorerMax allows you to rename all the files at one time.
3. Quick file search with grouped results. If you search a keyword, it may return with many results. If all the results are listed in one place, it may be hard to find the one that you want. If the results are listed by catogories such as pictures, audios, documents, etc. it would be easier to find the wanted file.
4. Bookmark your favorite folders. There must be some folders that you need to use very frequently. In this case, it would be great to bookmark the frequently used folders for quick access.
5. Adaptive to system display scaling. If you want to change the size of the text and other items, you need to change your display scaling to 125%, or 150%. In this case, ExplorerMax would fit the size automatically for best view experience.
6. Archive/Extract files with one-click. ExplorerMax supports the file extraction from various formats. Also, you can add your files to archives (zip/7z).
Download, Install and Register
You can download the ExplorerMax installer from our official website or from the button below. It is always the newest available version.
Start Your 30-day Free Trial Now
After you downloaded it successfully, click the installer to install it. You may change the installation folder as needed. The installation process should be done very soon normally. After that, you can click "Start Now" to launch ExplorerMax.

Note that you can use ExplorerMax for free for 30 days. In the trial period, all the features are open. You can enjoy it as the full version. After the period, you have to register to continue to use the full functions. Register means you need a license key to unlock the restrictions for full features. If you own a license key, click the Register entry and enter the license code in the specified box.
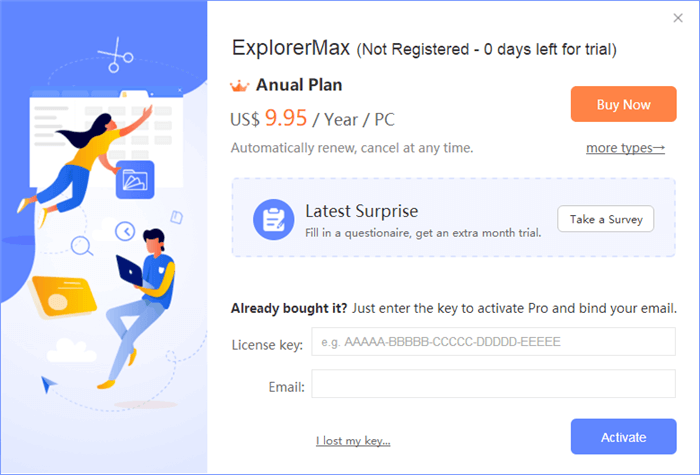
Notice 1: When you reinstall ExplorerMax on your PC, it may requires you to re-enter the license key and email. Thus, you'd better bookmark the email incuding your key and order details.
Notice 2: We've added email identification in the rigistration process since ExplorerMax v2.0.1.2. If your version is older than this, the re-installation may also requires you to bind the key with an email address. For keys working on 3 PCs, they can be bound to 3 email addresses.
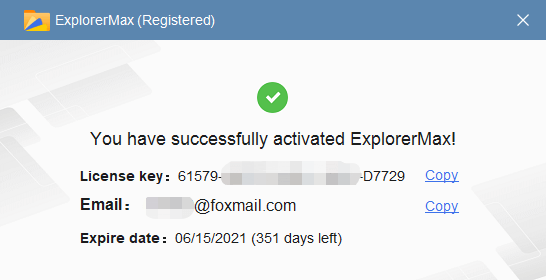
If you don't have a license code yet, go to the online store to purchase one based on your demands. There are 9 kinds of license codes available: Monthly license for 1 PC, 3 PCs, and 5 PCs; Yearly license for 1 PC, 3 PCs, and 5 PCs; Lifetime license for 1 PC, 3 PCs, and 5 PCs.
FAQ
Have you got any questions when managing files with ExplorerMax? Here is a complete list of answers to frequently-asked questions.
Q1: What languages does ExplorerMax support?
So far, EM has supported English, Korean, Polish, French, Simplified Chinese, Traditional English.
Here, we're really appreciate the hard work of those awesome volunteers.
Thank Largo for helping with French translation work.
Thank Staszek for helping with Polish translation work.
Thank Dae-Seok Kim for helping with Korean translation work.
Thank Jason Liu for helping with Chinese (Traditional) translation work.
And Spanish and Italian versions are on the way.
Notice: If you're willing to contribute to our translation work, please contact us immediately. Volunteers can always enjoy the latest features of ExplorerMax and get a lifetime license as the reward. If you refer a friend to help us translate EM to other languages, you can get a 1-year free license.
Let's build a great product together and get EM known by more.
Q2: Do you have an extra discount for students?
Yes, we'd love to offer 30%-off for individuals and 40%-off for groups (> 20 students). Please contact us ( contact@drivethelife.com ) with edu email and attach your current valid student ID.
Notice: Fake ID or wrong details will get your key banned.
Q3: How to update ExplorerMax to the latest version?
Solution 1: Launch ExplorerMax, direct to [Menu] > [About], and you'll know the existing version on PC. Then click into our homepage and check if there is any update.
Solution 2: There is an update exe in set-up files. It will run periodically to check if the latest version and present the new features automatically.
* In the future, we may offer an option to allow users arrange the upgrade manually.
Q4: How to search for things indexed in my network drive?
For time sake, ExplorerMax’s search only works on things indexed in local drives by default. But if you have a mapped network drive, what can you do?
Solution 1: Add the drive path to the search index.
1. Exit ExplorerMax (End the process of ExplorerMax.exe and Everything.exe) . Right-click the shortcut of ExplorerMax on the desktop and click [Open file location].
2. Enter the folder and launch Everything.exe individually.
3. Go to Tools > Options > Indexes > Folders, then add the path of mapped network drive. (This search speed may be slower than local search. Be prepared.)
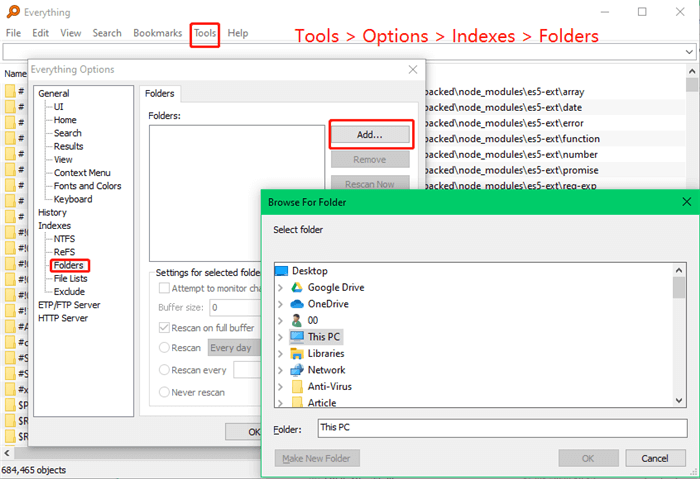
* If Everything's surface is not in English, please contact our support team and get the language pack. Then end the process of Everything.exe in task manager and unzip the language pack in the installation folder. Restart it.
Solution 2:
Since ExplorerMax has reserved File Explorer's search box in it, there are two search entrances on the surface now.
You can try local search in upper entrance in the minibar (EM) and do network drive search in the search box next to the path (FE).

Q4: Why is the tool called Everything running in the background?
Everything is a super powerful file search tool with the open source agreement. To better the file search experience, ExplorerMax has added Everything as the support plugin and activate part of its services. This can allow you target files in a second.
* For existing user of Everything, you may find that its icon disappears when launching ExplorerMax. Please pin it to the taskbar or add a shortcut to the desktop.
Q5: Why does ExplorerMax is launched immediately when I just start my PC?
Because there is an option you forget to disable. It's [Launch ExplorerMax on startup]. How to do it?
Step 1: When installing ExplorerMax at the very beginning, you may uncheck the option of [Launch ExplorerMax on startup]. It's that easy.
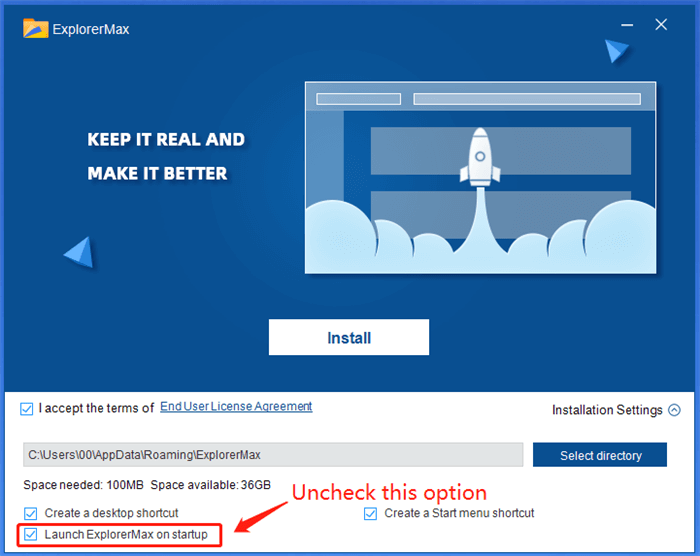
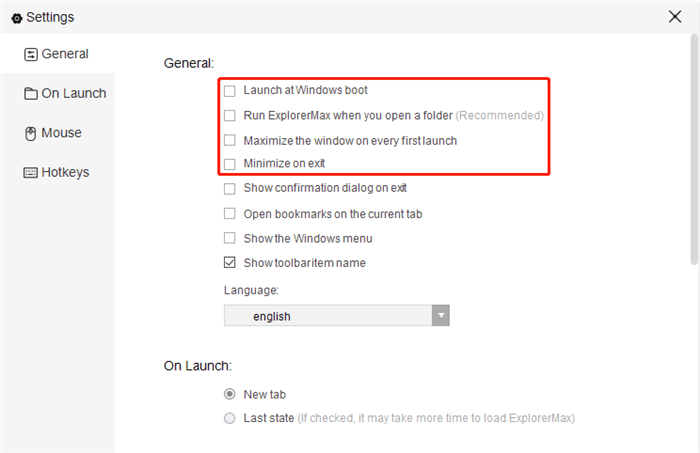
Step 2: If you have missed the above part, please go to [Menu] > [Settings] > [General] and disable the option of [Launch at Windows boot]. Problem is solved!
Q6: How to stop setting ExplorerMax as my default file manager?
Some users may find that ExplorerMax has taken over all tasks that Windows file explorer do. Don't be angry about that. Your PC just works in a recommended mode.
To let it give back the control, you may go to [Menu] > [Settings] > [General] and disable the second option called [Run ExplorerMax when you open a folder].
* After that, you'll need to double click the shortcut on the desktop to launch ExplorerMax. So think twice before the action.
Q7: How can I change the font size and style?
Sorry that we haven't applied this feature to ExplorerMax yet. Maybe in the future!
Q8: Are there any hidden tricks for ExplorerMax?
Please read our best-picked strategies listed here: 4 Hacks to Master the Art of ExplorerMax
Hack 1: Find the best-fit skin color for ExplorerMax on Win 10
Hack 2: Simplify the interface by hiding toolbar and windows menu
Hack 3: Search fast and efficiently
Hack 4: Win a free license by writing a featured review
Q9: Can I get a reward if I write a featured review for ExplorerMax?
Yes. For more details, please read about review program.
Your suggestions are always welcome.
File Search
One of the most powerful features of ExporerMax is its ability to process the file search. Click "Search" from the top menu, and you will be redirected to the search section. Then input the keyword that you want to search. Press Enter key, the results will be displayed in categories: Documents, Pictures, Programs, Videos, Audios, Compressions and Others. You can also view them all from "All" entry.
Also, ExplorerMax enables you to search under the whole PC and certain disks since v1.0.0.20.
You may also want to check our Youtube Tutorial Videos.
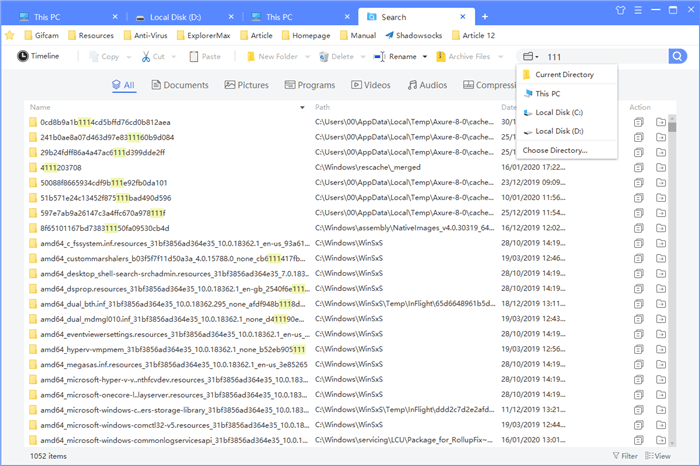
Documents: Contains various common file formats such as .doc, .docx, .xls, .xlsx, .txt, .ini, and so on.
Pictures: Contains common image formats such as .jpg, .jpeg, .png, .bmp, .gif, and so on.
Programs: Contains executable file formats such as .exe, .dll.
Videos: Contains common movie file formats such as .avi, .mp4, .wmv, .mpg, etc.
Audios: Contains various common music/audio file extensions such as .mp3, .wma, .wav, .aac, .flac, etc.
Compressions: Contains various common archive formats such as .zip, .7z, .rar, and so on.
Bookmark Folders/Files
It is convenient and necessary to have a quick access to the frequently used files or folders. Yeah, that's what Bookmarks does for you. If you want to have easier access to one or more folders/files on your Windows system, you can add it to bookmarks.
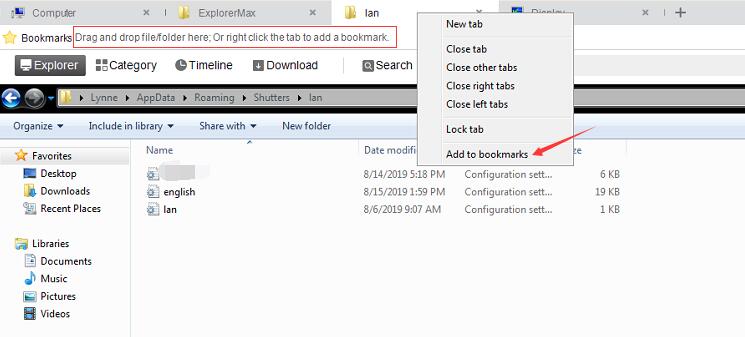
On the top left corner of ExplorerMax, you can find the Bookmarks entry. Just drag and drop the file or folder to the bookmarks section or right click the folder or file tab, choose "Add to bookmarks".
Dual Pane
Tired of switching two tabs? Add them to the dual-pane!
Dual pane is a great solution to simplify your folder-to-folder interactions. In this mode, two folders will be displayed at the same tab and allows any direct operations like drag-and-drop.
How to launch Dual-pane?
——> Launch ExplorerMax and click [Dual pane] in the tool bar.

——> You may also add the certain tab to the dual-pane by a easy right-click on the tab name.
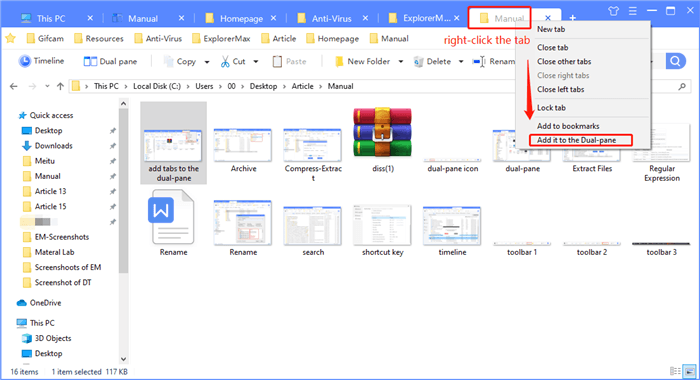
Notice: The function of changing the layout of files has been moved to the left of path line.

Future updates:
Since Dual-pane is still a beta version to be tested. More fluent interactions will be available in the future. Contact us if you have great suggestions for ExplorerMax. (contact@driverthelife.com)
Rename/Batch Rename
Now, a powerful rename function is added to ExplorerMax.
How to quickly rename one file?
Solution 1: Select the file and press [F2], then you can type a new name.
Solution 2: Select the file and press the button [Rename] in the toolbar, then type a new name.

How to quickly rename multiple files by replacing the same txt?
1) Select targeted files while pressing [Ctrl], then click the button [Rename] in the toolbar and select [Batch Rename].
2) Modify your rules for renaming.
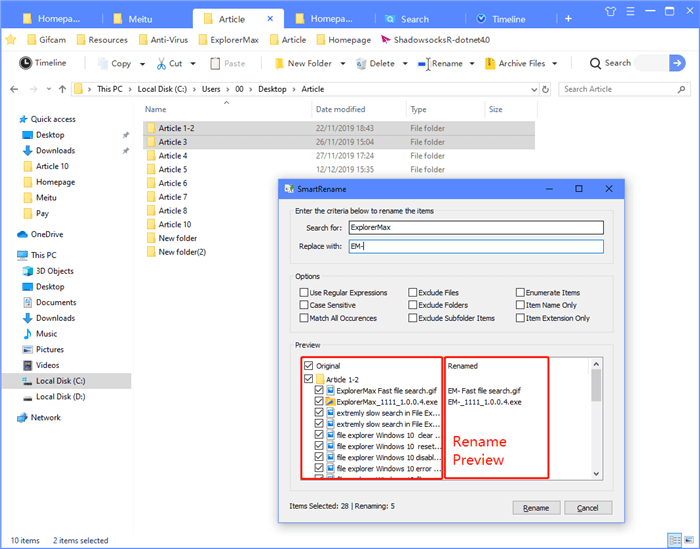
[Search for] -- Type the text needed to be replaced.
[Replace with] -- Type the text to replace the part matched by your search text above.
[Options] -- Check the option to rename your files selectively.
1. Use Regular Expressions: When you check it, contents you’ve entered in the Search box and Replace box will be interpreted as a regular expression. Both of them can contains some regex variables. Otherwise, the Search box will be only regarded as a text to be replaced with the text in the Replace box. (See examples below)
2. Case Sensitive: When you check it, only the file names exactly matched with the content you’ve entered can be picked and renamed. Eg. Search[A], files like "Axxx" are counted while “axxx” will be ignored.
3. Match All Occurrences: Sometimes a file’s name may contain several same targeted words, such as 12-xxx-12. If you want to replace 12 with 78, you can check this option and it shall be like this: 78-xxx-78. Otherwise, it will be 78-xxx-12. (Only first instance in the txt will be included.)
4. Exclude Files: Files will not be included in the operation.
5. Exclude Folders: Folders will not be included in the operation.
6. Exclude Subfolder Items: Items within folders will not be included in the operation. By default, all subfolder items are included.
7. Enumerate Items: Appends a numeric suffix to file names that were modified in the operation. Ex: foo.jpg -> foo (1).jpg
8. Item Name Only: The file extension will not be renamed. Ex: txt.txt -> NewName.txt
9. Item Extension Only: Only the file extension will not be renamed. Ex: txt.txt -> txt.NewExtension
Note: For most people, a simple search-and-replace is enough. For others who want an advanced search pattern for text, Regular Expressions can be used to search, edit and manipulate text in the ECMAScript grammar. (You may check "Match All Occurrences" while using regular expressions.)
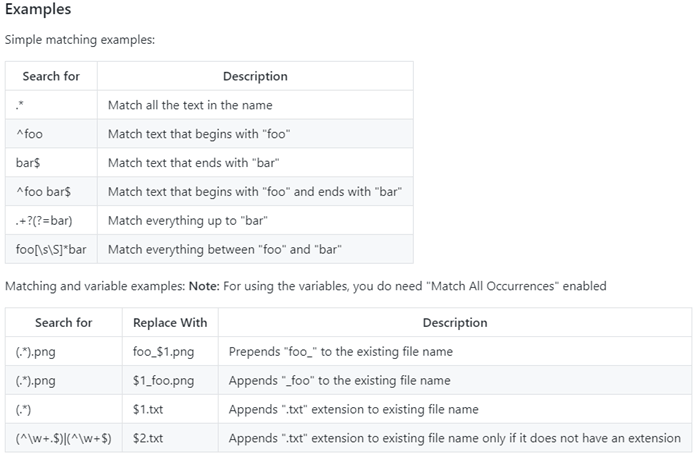
For more tutorials about Regular Expression tutorials, you can click here.
How to use Windows built-in renaming?
If you think the former standard rename is too complicate to use, you may try the traditional way.
1. Open the folder that contains all the files that you want to rename.
2. Press [Ctrl + A] to select all files.
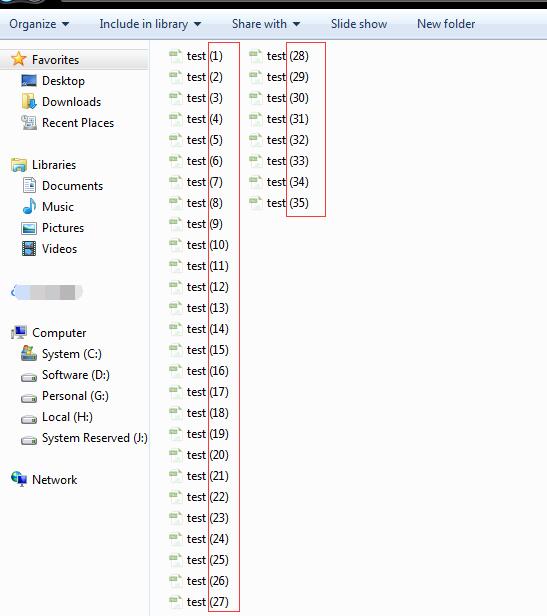
3. Press F2 or right click any of the file, then you can rename them all by typing a new name.
Please note that as you typed the new name and press Enter to confirm the renaming, all the selected files are renamed using the same structure with different numbers. For example, test (1), test (2), etc.
Archive/Extract
With the release of ExplorerMax 1.0.0.16, archive support is available now. It’s that easy and useful.

1. How to add files or folders to archives?
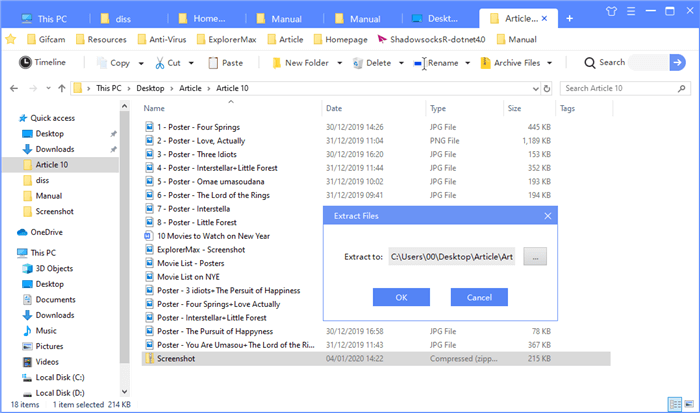
Select the file/folder and press the button [Archive Files] in the toolbar. In this way, it can be added to Zip/7 z archive located in the current folder soon.
If you want to generate a zip archive in a certain path, you may click the drop-down next to the button [Archive Files]. Then select [Archive files to] and modify information about path, name, format, speed, and password if needed.
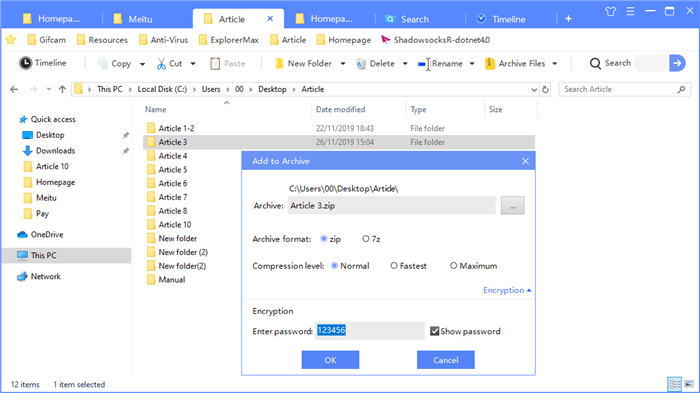
2. How to extract files or folders from archives?
Select the file/folder, click the drop-down next to the button [Archive Files]. For those who want to extract it in the current folder, you can press [Extract Here] in the menu. For those who want to extract it in the target folder, you should press [Extract to] and enter the path.
Timeline
The function of timeline is specialized for users who want to locate targeted files quickly through file-managing history.
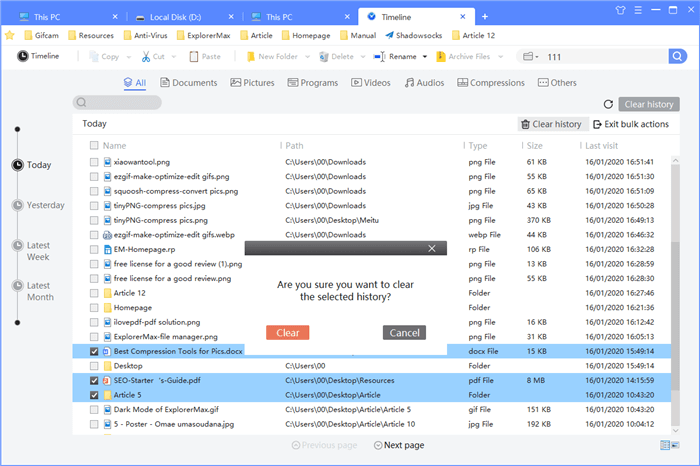
Here are four sections in the timeline to locate your history -- Today, Yesterday, Latest week and Latest month. More importantly, these results are still displayed in categories, such as pics, docs and videos. Also, you can change the folder view into detail-based or icon-based on the downside right corner.
Moreover, unwanted file explorer recent history can be removed efficiently. You may click clear history to select records in sections or remove it one by one via Bulk Actions. Remember that clearing history here won't delete your files at all.
An Ultimate Guide for PhotoMax
What is PhotoMax?
PhotoMax is the first available plugin for ExplorerMax 2.0.0.0. It’s a comprehensive photo manager, aiming at managing your media sources such as photos and videos.
Key Features of PhotoMax 1.0
1. Mark photos or videos as your favorites
2. Edit photos: draw, crop, rotate, zoom, copy, and delete
3. Import photos and videos through the fast scan or the drag-and-drop
4. Manage media files with customized albums, slideshows, timeline and map.
5. Support light mode and dark mode
Tips: Feel free to sent features you want to us. (Email to contact@drivethelife.com) A special surprise may come if your advice is picked.
How to Get PhotoMax?
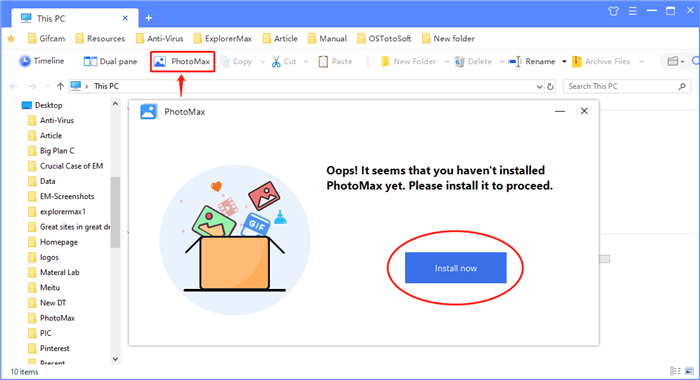
1. Launch ExplorerMax and press the button of PhotoMax in the toolbar.
2. Click [Install Now] to proceed with the download and installations.
3. After a few seconds, you can experience the fluent photo management of PhotoMax.
How to Use PhotoMax?
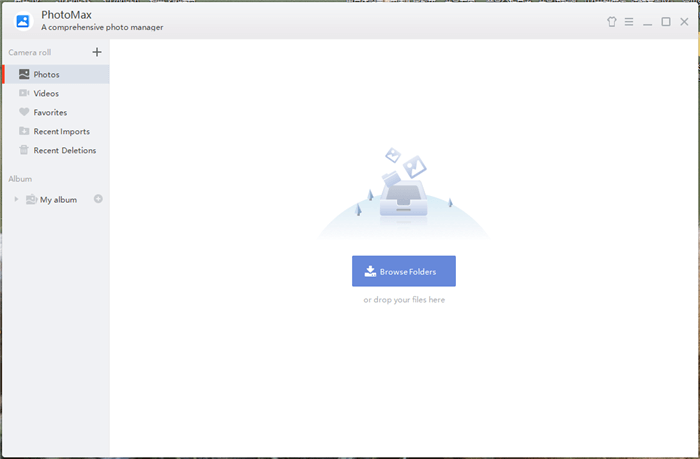
1. Import your files: There are several entrances to import your photos or videos.
Click [+] next to [Camera roll] in the left slide-bar, then select the specific folders.
Click [Photos] in the left slide-bar, then browse folders or drop photos in the blank space.
Click [Videos] in the left slide-bar, then browse folders or drop videos in the blank space.
Click [Menu]-[Scan local files], then select the specific folders.
When those media sources are imported, you can check them by [Timeline] mode in the dashboard. All photos or videos will be presented based on the date.

Supported Formats of Pictures: JPG, PNG
Supported Formats of Videos: MP4, AVI, MOV
2. Mark photos/videos as favorites
Select the pic in the dashboard and click the heart icon.
You may check all your favorites in the section of [Favorites].
3. Create albums to group photos
Click [+] next to [My album] in the left slide-bar, then double-click it to rename the album.
4. Add pictures/videos to custom albums
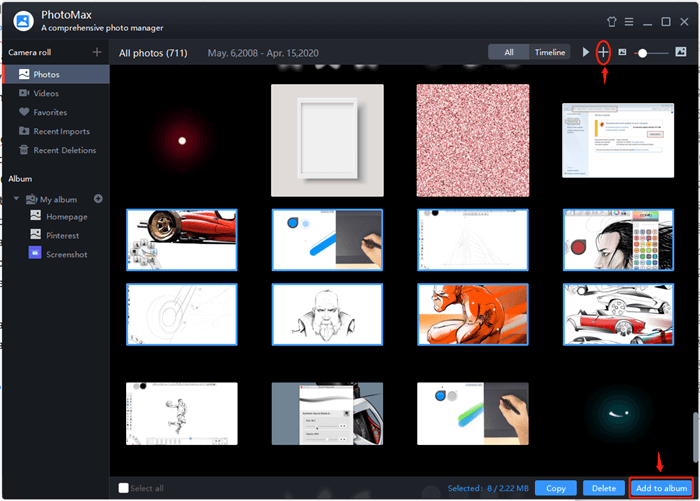
5. Edit photos
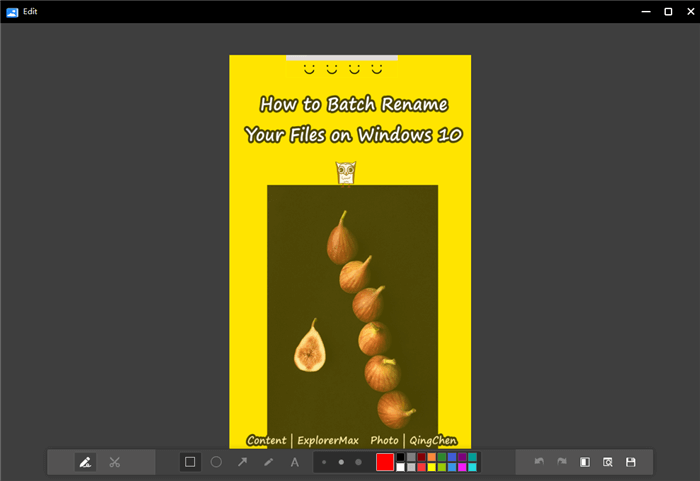
Double click the photo to enter the edit page. Here, you can draw, crop, rotate, zoom, copy, and delete the picture. (Full screen is supported, too.)
6. Delete and restore photos/videos
How to delete: Select the file, then right-click to delete.
How to restore: Enter into the section of [Recent Deletions] and select items to restore.
Notice: All files in [Recent Deletions] will be automatically deleted after 30 days.
7. Convert HEIC to JPG/PNG (Batch converting is supported.)
Step 1: Import your heic photos in PhotoMax
Step 2: Select the photos and right-click to check [convert to (HEIC)].
Step 3: Select the targeted format and wait a second.
* This is a paid function.
8. Display photos in the map (NEW)
Step 1: Click [Place] to check all the photos in different loacation.
Step 2: Switch to [map] mode and see all photos displayed in a world map.
9. Uninstall PhotoMax
Right-click the icon of PhotoMax and open the file location.
Scroll down and find [Uninstall.exe], then double-click it to finish the whole process.
Remember to save your important files in the section of [Recent Deletions] before proceed the uninstall.
How to Solve No-display Issue on PhotoMax?
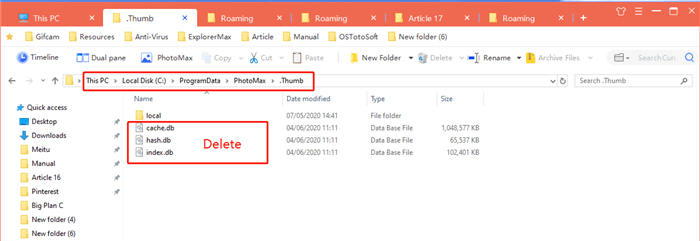
If you have installed the version of v1.0.0.6 or other versions lower than 1.0.1.20, you may find that some pictures can not be displayed right on the dashboard. That's because we've changed the better way to store thumbnails.
Here is the solution: (see screenshot below)
Open the folder path [C:\ProgramData\PhotoMax\.Thumb] and delete three .db files -- index.db, hash.db, and hash.db. Then you can get everything back on track.
All in all, Photomax 1.0 is still a beta version. We’ll keep improving it in the future.
Suggestions and reviews are welcome.
Light or Dark Mode
To fit in Windows 10 Dark Mode, we now offer several color options for users.
1. Click skin icon  to launch settings.
2. If you want to customize the skin of ExplorerMax, select [Customize] and choose one color. Light and Dark are optional for sections of toolbar, timeline and search box.
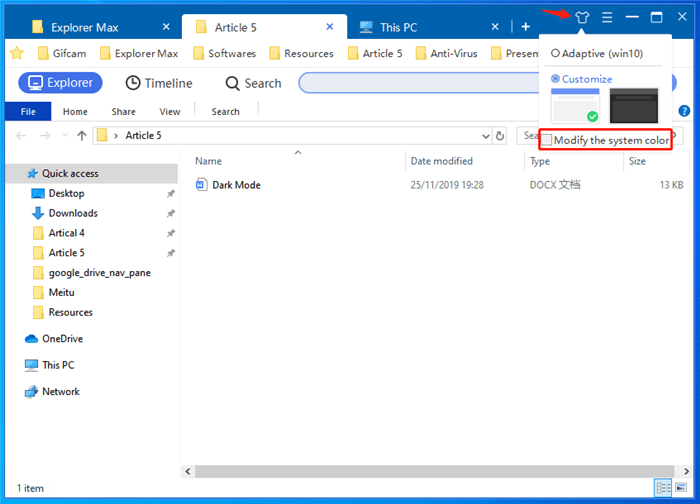
Moreover, you may select [Modify the system color] to have whole interface and system color changed together. In this way, you don’t bother to open the setting menu.
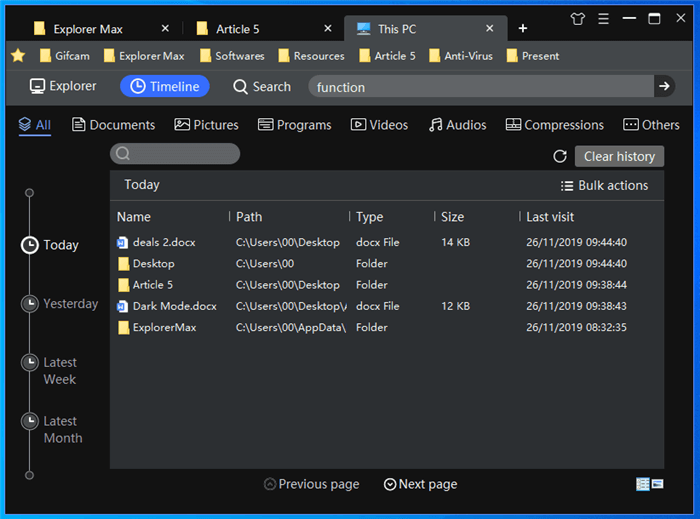
3. If you want ExplorerMax adapted to your PCs color preference, select [Adaptive (Win 10)]. Then, you’ll find that it responds to your light or dark mode soon.
* When you allow the customized system color show in [Tittle bars and Windows borders], you may surprisingly to see it work on our file manager at the same time.
* This option is only available to PCs on Windows 10.
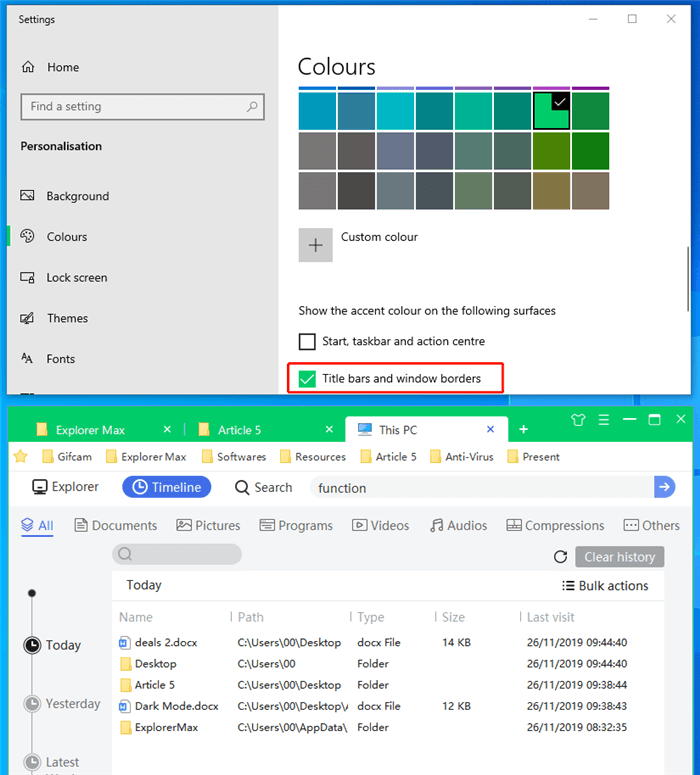
For more instructions of setting up the system color, you can check this article below:
Tips:How to Enable a Better Dark Mode for File Explorer
Hope you can enjoy this colorful file trip.
Customize Settings
Click on "Settings" from the top right menu, then you can customize the program's settings according to your needs.

General settings lets you choose if you want to launch ExplorerMax on Windows bootup;
Whether you preferred to run ExplorerMax automatically when you open a folder;
Whether you want to maximize the pane when you launch ExplorerMax or not;
Whether you want to exit or to minimize it when you click the "X" icon;
Whether you want the confirmation dialog to pop up or not on exit.

On launch settings lets you determine whether you want a new tab or to keep it the last state when you launch ExplorerMax. If you choose it as "Last state", it means that all the tabs not closed before the last exit would display in the new launch.

Mouse operation settings would enable you some quick operations on the tab. For example, if you check "Double-click on empty space to go back", it enables you to go to the previous directory after you double clicking on the empty space. If you check "Double-click tab to close it", it would enable you to close the tab by double clicking on the tab.

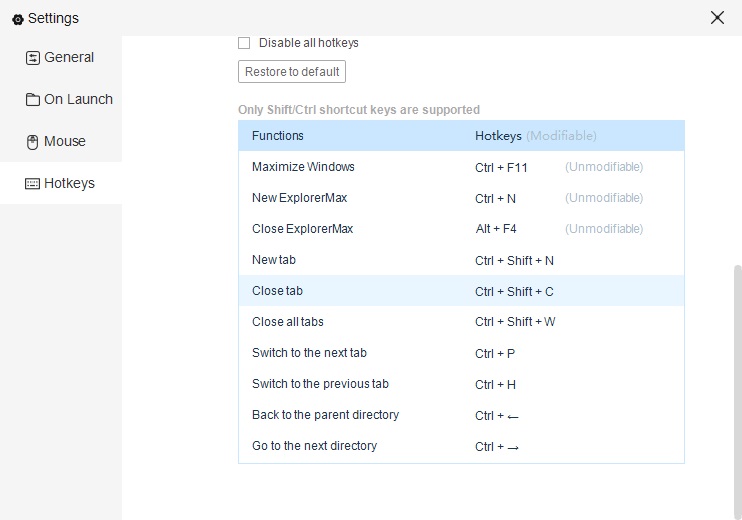
Hotkeys settings helps you set shortcut keys for some specific operations. Some of the shortcut keys are editable. So you can modify them if needed.
How to Uninstall / Remove ExplorerMax
You may uninstall ExplorerMax by either of the following 2 methods:
Method 1: Uninstall it via the in-built Uninstaller
Step 1: Locate the ExplorerMax shortcut icon.
Step 2: Right click it and choose [Open file location]. In this folder, you can locate the Uninstaller called [Uninstall] with the file description "ExplorerMax Uninstaller".
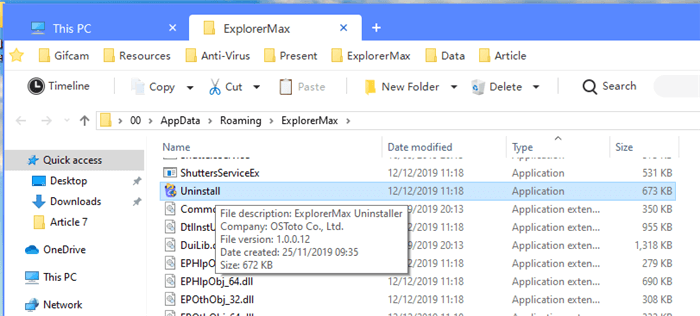
Step 3: Double-click it to start the process and follow the on-screen guide to complete it.
Method 2: Uninstall it from Settings/Control Panel
Step 1 (For Win 10): Locate Settings>Apps>Apps and Features.
Step 1 (Not Win 10): Enter into Control Panel, click [Programs] and press [Uninstall a program].
Step 2: Scroll down to locate ExplorerMax and uninstall it.
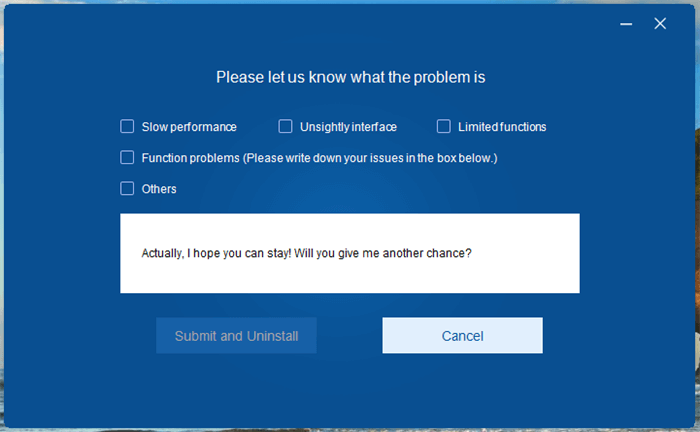
Notice: We are so sorry if ExplorerMax doesn’t meet your expectation. Please let us know the reason and we will try our best to improve our product. Hope to get a chance to serve you better.


